The Tale of Frankenpot
When writing blogs, typically one finds little opportunity to write Mwhah, hah hah! In this case I feel justified as I am about to describe to you, dear reader, the Tale of Frankenpot. Mwhah, hah hah! (If you just imagined an eerie castle flashing in the night sky by a massive lightning strike, kudos to you.) Caution: If the drama of this tale overwhelms you at any point, please pause your reading and return once your heart has returned to its normal rhythm. Warning: This story starts out scary; however it resolves to a happy, and I think quite lovely, ending. Read on. If you dare!
How I Reversed the Traditional Frankenstein Tale
Sometimes my projects come to me for no other reason than I want to challenge myself. Take the buffet I recently refinished. It had been used for years as a workbench in my garage workshop. I challenged myself to save it, refinish it, and find it a proper home. With this newest challenge, I began with a monster—a large resin pot that sat outside for years and deteriorated and neglected to the point its base had rotted away. As I headed to the trash to dispose of this tragic vessel, I suddenly wondered if I could save the hideous creature. In a reverse Dr. Frankenstein move, I turned it from a monster to a normal, useful pot simply by showing it the love it had been missing. I gave it life. From broken artifact destined for the dumpster, I created “Frankenpot.”
Steps For Pot Refinishing

1. Accessed the current condition of the pot. In short, mine was a mess. It had no bottom and with cracking on the sides from being outside for so long. Whatever plan I came up with had to address these two challenges.
2. Solved for the missing bottom. I was rummaging around in my workshop and suddenly an idea came to me. Could I find a new pot the old pot could fit inside? Turns out I had a plastic pot sitting in storage that the old pot fit partway down inside, thus giving it a new bottom.
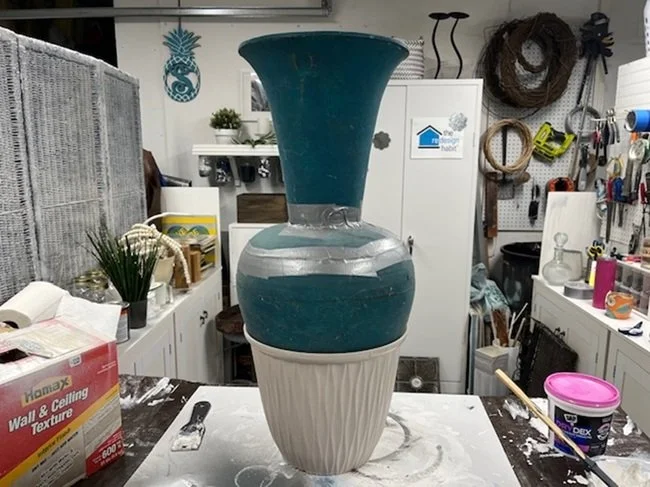

3. Attached old to new. My idea was to use plaster and cover the entire Frankenpot. However, I had seams to deal with as well as cracking. To reinforce these areas, I used duct tape. Yup, I went MacGyver on this pot! I taped the seams and weak spots to add strength and stability.

4. Applied plaster. I used stucco mix to connect the pots applying heavily to cover seams and duct tape. This process took a couple of days to get the whole thing covered well with the finish I desired. Eventually it looked like one pot not two.

5. Painted the finished pot. I found some blues and whites in my paint leftovers. The blue and white would work well with the color palette on my patio. I used a fairly dry brush and applied the first coats of blue, alternating with white and another shade of the blue. I also let some of the plaster finish show through. I was trying to create the look of a big, heavy cement pot, so showing the rough texture worked well to help achieve that illusion. I returned several times adding or taking away colors until I got the look that I wanted. Finally, I went over the finished paint very lightly with some dark walnut stain to add some age to it.

6. Sealed the finish. I wanted to try and protect the finish as much as possible since this pot would be living on our patio. I used a spray poly and gave it several coats, letting it dry thoroughly in between.
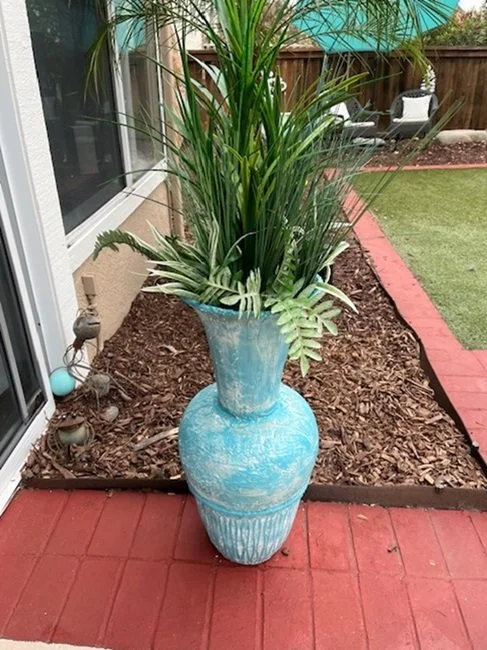
7. Added the plants. Because I wasn’t sure how waterproof Frakenpot would be and how well it would stand up to having wet, damp potting soil in it, I decided to use artificial plants in it. We put rocks in the bottom to prevent it from tipping over. My hubby had the brilliant idea of filling up the dead space in the middle with cut-up pool noodles so the pot wouldn’t become too heavy. Next, I layered in a little bark to cover the pool noodles and secured my plants. It worked out slick because I could just push them directly down into the noodles to secure them.
Conclusion to the Story
That my friends is the tale of the Frankenpot makeover. It turned out pretty well considering where I started. “Frank” looks pretty outside the patio doors and adds a nice pop of color to that space. I love to save items from the trash whenever possible. This one was definitely fun. I mean, how often do you get to give a monster life? Mwhah, hah hah!
Final Note
While I used this process to save an existing pot, you could use the same process to create a unique new pot by finding two that fit together well then follow the above steps. Dollar Tree pots are perfect for a project like this as they are super affordable.
Now, what will you do next to love where you live?
Please feel free to reach out to us at The Redesign Habit and ask questions or simply share a project that you are working on or have completed.
For more great stories and ideas please follow us on Facebook and Instagram.